Hard Disks
Introduction
 Hard disks have been around in some form or other since the 1960s, but the first hard disks that appeared in a PC were those introduced with the IBM PC/XT (eXtended Technology) in 1983. This computer came with a Western Digital 10 MB (megabyte) hard disk as standard. However, due to the high cost of hard disk drives in PCs right up to the mid-80s, it was relatively uncommon for a non-business PC to have a hard disk until around 1986. It wasn't until 1989 that hard disk prices had come down to a price point that most home PC buyers could really afford one - the extremely popular Seagate ST-225 that had a 20 MB capacity then had a retail price of $230, and if you could afford one, the highest-capacity 80 MB Seagate ST-4096 had a price tag of $630.
Incidentally, I want to mention that the term "hard disk" and "hard drive" are the same. It's a bit strange, but whatever you learned to call it is what you continue to say today - to me they are hard disks, but then for floppies I would say floppy drives (into which you insert a floppy disk) - I know, weird right? But there we go! In magazine adverts and reviews you would also see the abbreviation HDD (Hard Disk Drive) used prolifically.
 These first hard disks were sometimes called "Winchester" disks due to their historical name from mainframe days, and were also often referred to as a "fixed disk" to distinguish it from a "floppy disk" (aka a removable disk), since the disk itself was non-removable. They took up two 5.25" drive bays, one above the other (see the top picture) - the same as the first floppy disk drives, and this physical size was later referred to as "full height". The 5.25" here means the drive itself has a physical width of 5.25". Early desktop PCs like the first IBM PC, XT and AT tended to have up to four 5.25" "half-height" drive bays, so a full-height hard drive would take up two of these. Coinciding with capacities of 20 megabytes (MB) and higher, manufacturers started to introduce "half-height" hard drives (see pic to the right). These took up just one 5.25" half-height drive bay. The same form factor was also later adopted for CD-ROM drives due to the already-prevalent adoption of this physical size for drive bays in PC cases.
 Only with the introduction of the IBM PS/2 range did PCs start to appear with smaller 3.5" drive bays (3.5" wide) to support the new floppy disk format. These days all hard disks are either 3.5" (for desktops and servers), or 2.5" (typically for laptops) in width. During the transition from 5.25" to 3.5" it was quite common to have 3.5" drives sit inside a 5.25" bracket within the 5.25" drive bay, and in the case of floppy drives, also have a plastic bezel around the drive's front so that it looked cleaner when used in a 5.25" drive bay.
MFM, RLL, IDE, SCSI ?
Early PC hard disk drives used MFM (Modified Frequency Modulation) encoding to store data on the disk surface, the same as PC floppy drives did, and always have. Shortly after hard disks became more common, a similar encoding scheme came around, called RLL (Run Length Limited). Whilst MFM was quite simple to implement and robust, RLL used the same electrical interface and cables but by using a different data format RLL was able to squeeze the data onto the disk more tightly, thus giving a 50% higher formatted capacity on the same number of disk platters (see image below). So a 20 MB MFM hard disk, when formatted using an RLL hard disk controller card, would result in 30 MB of formatted space. However, RLL did require a very accurate drive mechanism and early attempts to format older MFM drives using an RLL controller often resulted in data corruption. In a short time, hard disk manufacturers introduced special RLL-certified models, such as Seagate's ST-238R.
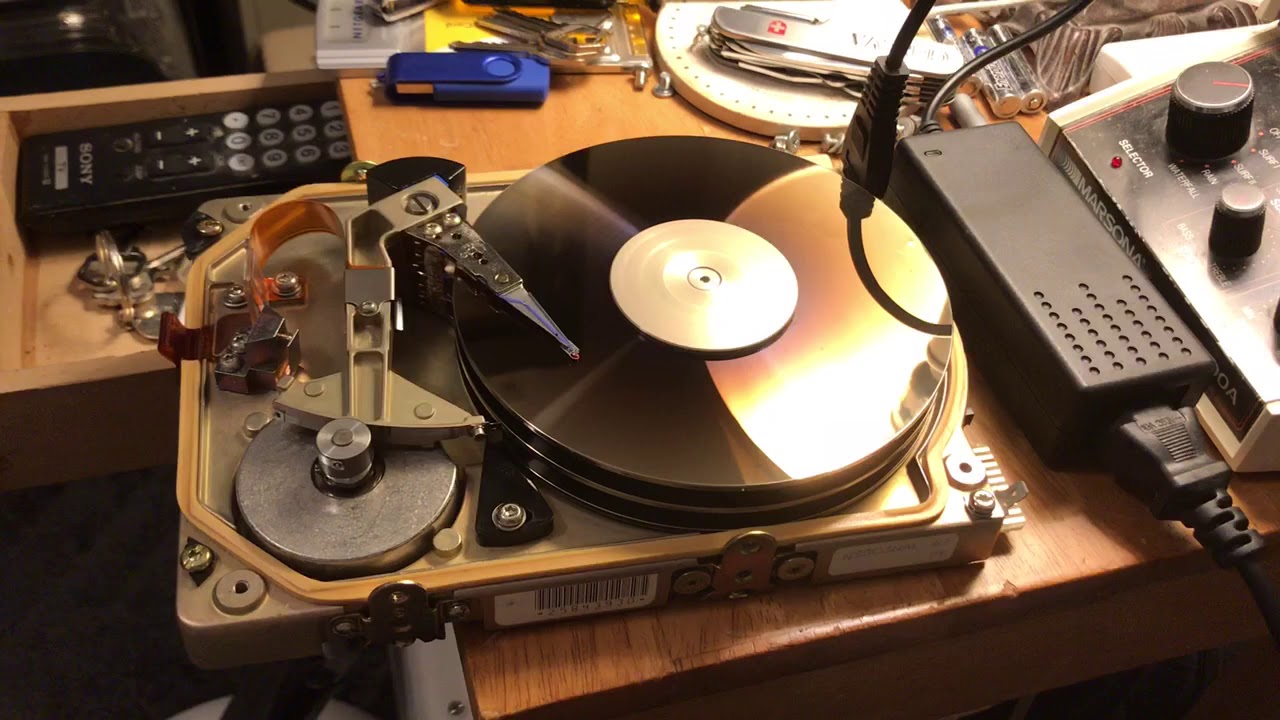
A Seagate ST-251-1 hard disk with the lid off!
Note the three separate "platters" onto which data is stored, and the drive head hovering over it on the left - the head arm in this picture would have six heads on it - to read and write data to both the upper and lower side of each of the three platters.
Technically, there was no such thing as an "RLL drive" (apart from the aforementioned certification from the manufacturers for specific drives they knew worked ok with RLL encoding) - the drive type ("MFM" or "RLL") was solely determined by the low-level format which itself determined how data would be written to the disk, and this in turn, depended on the drive controller card. Although as mentioned, RLL requires an accurate drive mechanism, so I'm sure it wasn't uncommon for drive manufacturers to brand a drive either RLL-capable or only MFM-capable, based on the results of their quality control tests before shipping!
Hard Disk Controllers
 In the same way that a PC required a floppy disk controller card in order to connect a floppy disk drive to your PC's motherboard, so too did a hard disk. It wasn't too much later after the ATA (IDE) industry-accepted standard that the circuitry that made up the "controller" would no longer reside on the bottom of the hard disk itself, instead being embedded into the PC's motherboard circuitry.
But I'm jumping ahead... whilst the early pre-IDE (MFM and RLL) hard disk controller cards (ST-506, aka Winchester cards) started off as almost full-length cards, as technology developed these were shrunk down drastically, with most of the components eventually embedded onto single chips (for more information, do a search for "VLSI"). Many third-party peripheral card manufacturers put these on what would be called "multi I/O cards" which incorporated both a floppy and hard disk controller onto a single card, and often would also have at least one RS232 serial port, a parallel port, and maybe even a game port (for a joystick) and realtime clock as an added bonus to help sell their card.
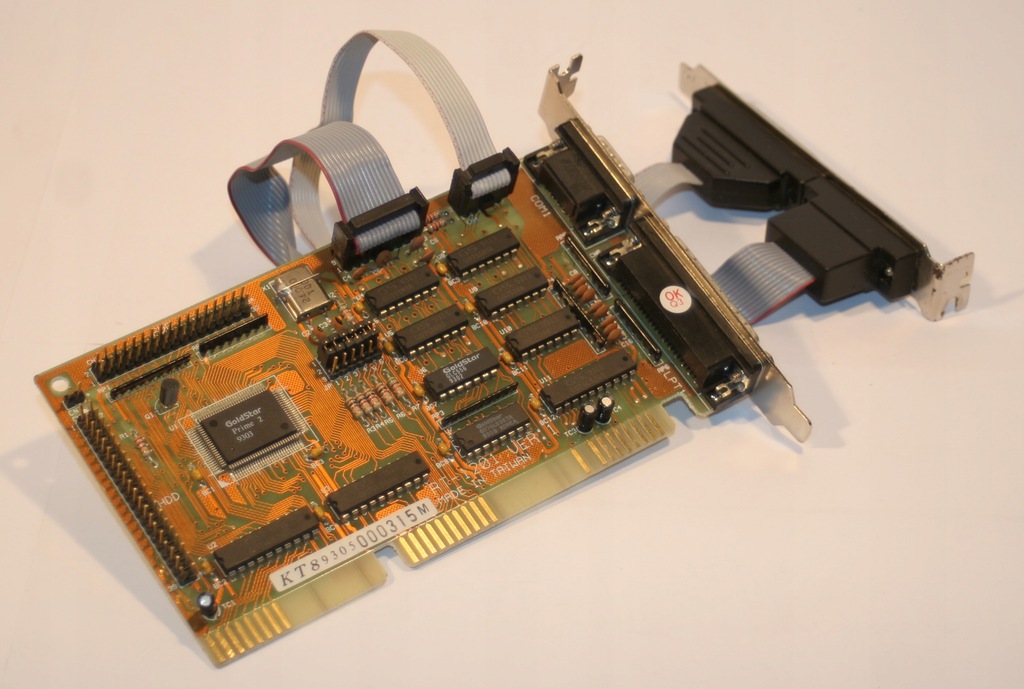
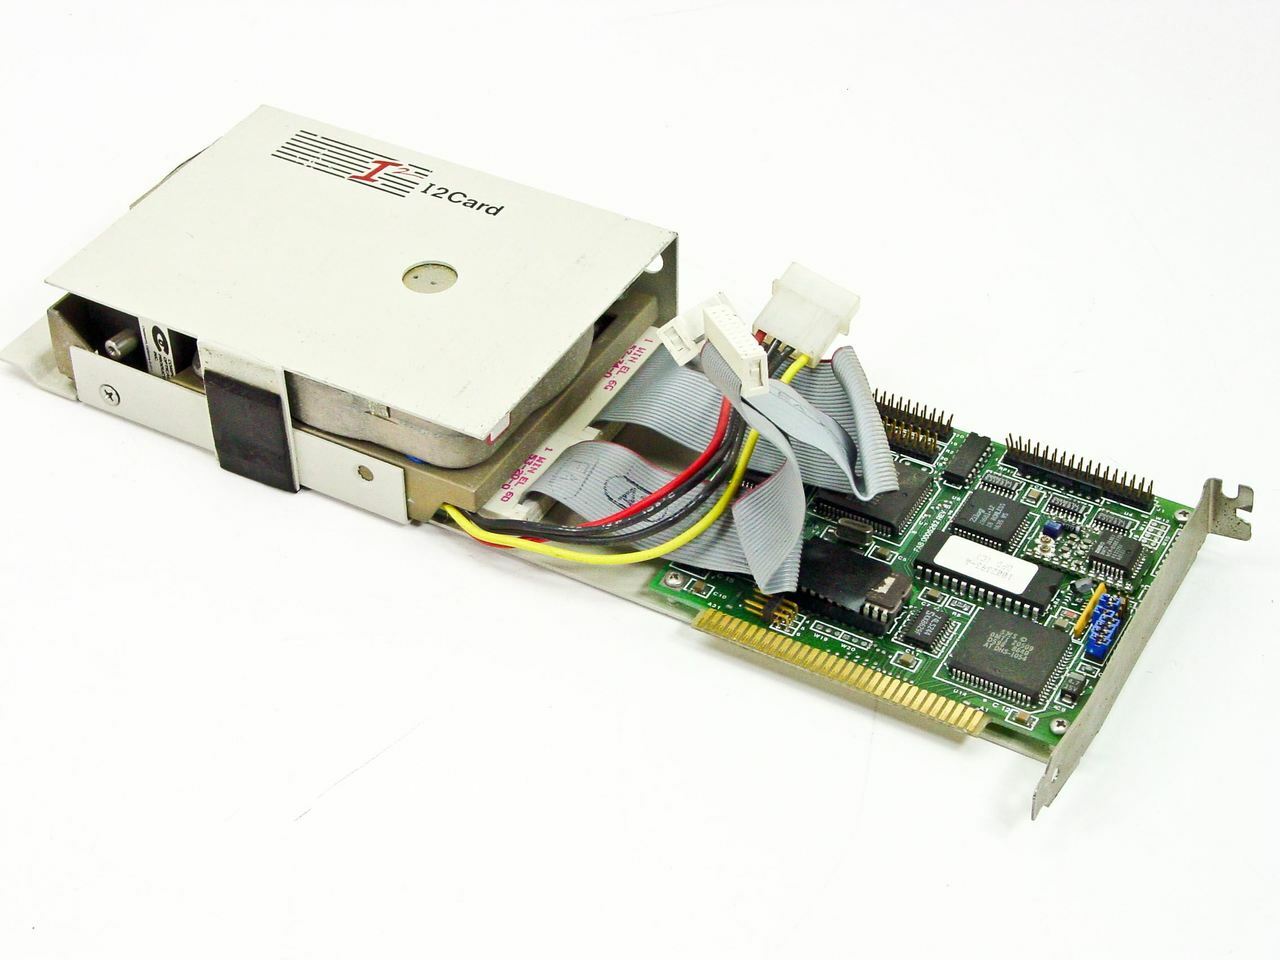
A Goldstar Prime-2 "Multi I/O" card with floppy controller, hard disk controller,
serial ports, a parallel port and game port.
 With MFM- and RLL-encoded drives the cabling that was used to connect the drive to the controller card was different to modern-day IDE drives. The drives had two edge connectors which connected to: (1) an IDC 20-pin cable for power, and (2) an IDC 34-pin cable for data. These are illustrated in the image to the left.
More modern hard disks (IDE, ESDI or SCSI) have an embedded "controller card" built into the drive itself - IDE stands for "Integrated Drive Electronics". The card we previously called the 'controller card' or 'hard disk controller' was actually just an interface between the basic drive controlling mechanism (on the drive itself) and the PC bus, and was sometimes referred to as an "ST-506" controller or "Winchester" controller. It should have really been called a 'host adapter'. Since the days of the Intel 80486 this interface is integrated into the motherboard - it's very unusual to have an 'IDE host adapter' as a separate, plug-in component, since the primary purpose of IDE is to eliminate the controller card entirely! You may have noticed that early 90s sound cards often had an IDE interface on them - this was purely to drive a CD-ROM or other optical drive, and is not really designed to run a hard disk.
Examining an old MFM or RLL hard disk, you will find very little actual circuitry there. A stepper motor, sure. A ton of glue logic, ok. But no full-on interfacing circuit board like you find on more modern IDE drives where the entire underside is a PCB. Here's the difference between an MFM drive and an IDE drive:
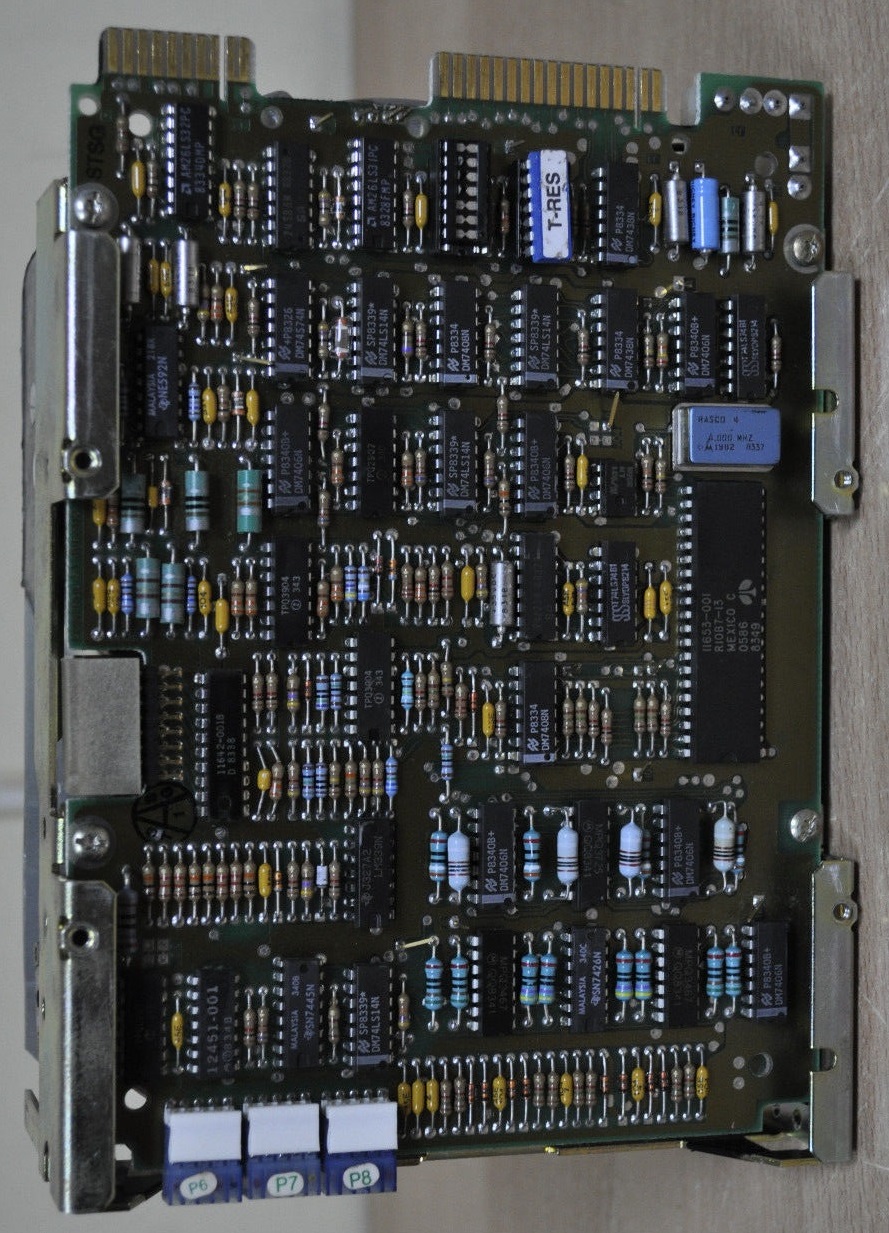
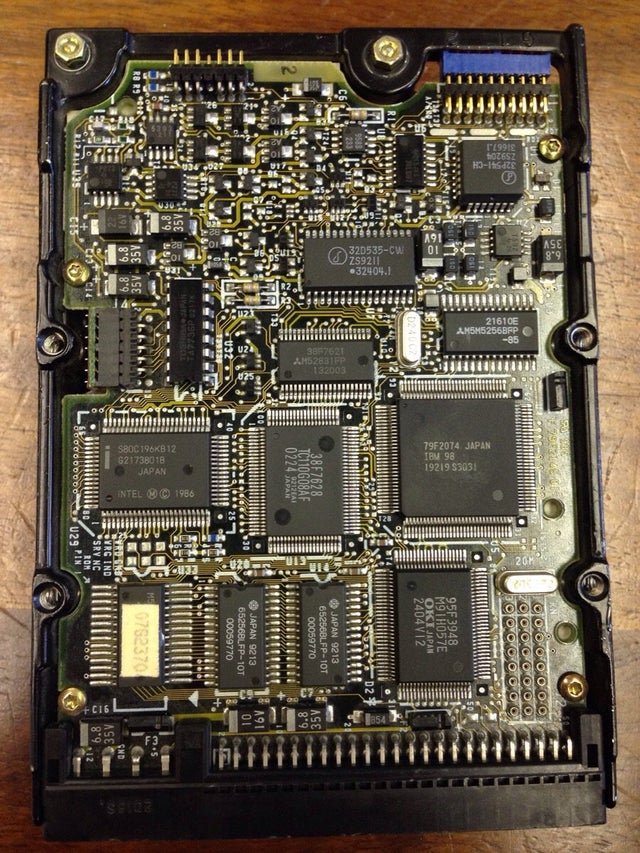
OK, you can't really see the difference, but trust me.. the drive on the left (ST-412 10 MB) needs a separate controller card. The drive on the right (IBM 160 MB) well.. you're basically looking at the controller card.
Until the mid-1990s, all IDE and SCSI drives actually used RLL encoding internally. IDE and SCSI electronics are 'smart' enough to take care of encoding in such a way that we no longer need to know the details. The ATA (AT Attachment) designation often used synonymously with the term IDE was its original (and more accurate) name, and it refers to the fact that this interface was originally designed to connect a combined drive-and-controller directly to the 16-bit AT (aka ISA) bus found in the 1984 vintage IBM PC-AT (Advanced Technology) and compatible computers.
Hard Cards
Around 1987 we saw a rather clever invention come onto the PC scene: hard cards. These were basically a hard disk installed "side-on" on a very long ISA expansion card, right next to its controller circuitry. The main reason why there was a market for such things at the time was because PC manufacturers often did not provide the same amount of disk expansion capabilities as IBM did in their PC, XT or AT computers. These all had 4 "drive bays" (2 "full-height" or 4 "half-height"), but as clones started arriving on the scene, quite often these would have only space for two half-height bays which usually would get used up by two floppy disk drives - maybe one 5.25" and one 3.5", or two of the same size. This left no space for any hard disk. Enter the hard card - With a hard card, the hard disk became part of the hard disk controller card itself, which sat in a spare ISA slot, so it did not use up a valuable drive bay! A hard drive's mechanisms were equally happy oriented either horizontally or vertically, so this would not have had a detrimental effect on the lifespan of a drive.
A typical hard card - a hard disk drive and its controller card,
all mounted vertically on a single ISA expansion card
Hard Disk Capacities Over the Years
Something that's useful for those building a vintage PC these days is to have an understanding of what was typical during a particular era, or in any given year. The table below gives some indication as to what hard disk types and capacities were typically available for the average home user during certain years, and their technology.
| Year | Capacity | Information |
|---|---|---|
| 1983-1986 | 10-20 MB | MFM encoding. Hard disk was connected to a hard disk controller card (8-bit ISA). "Hard cards" arrived late 1985 (hard disk physically mounted on a long controller card in the ISA slot). First IDE interface created in 1986 (ATA-1). |
| 1987-1989 | 20-65 MB | MFM or RLL encoding. Hard disk was connected to a hard disk controller card (8-bit or 16-bit ISA). |
| 1990 | 20-85 MB | MFM or RLL encoding is still common, but some IDE drives start to arrive. |
| 1991 | 40-120 MB | ATA (IDE) hard disks become more commonplace. |
| 1992 | 40-160 MB | IDE hard disks taking over. MFM/RLL not seen anymore. |
| 1993 | 40-300 MB | IDE hard disks supporting ATA Mode 4 standard. Motherboards start to appear with embedded IDE sockets, so no need for a separate host adapter card using up an expansion slot. |
| 1994 | 300-500 MB | EIDE (Enhanced IDE) arrives - some manufacturers make their own versions called "Fast ATA" or "Fast ATA-2". |
| 1995 | 300 MB-1 GB | Motherboards now almost universally come as standard with IDE sockets |
| 1996 | 300 MB-1.5 GB | Introduced LBA (Logical Block Addressing) for larger drives up to 8.4 GB |
| 1997 | 300 MB-2 GB | ATA-3 arrived, with 16.6 Mbps (megabits per second). Hard disks started to arrive with S.M.A.R.T. for hard disk health monitoring. |
Capacity Limits
When putting together a retro PC you need to pay attention to the size of your hard disk (and how it's partitioned and formatted). As hard disk drive technology has developed over the years, occasionally it is possible to hit problems where your old operating system or your motherboard's BIOS does not recognise the full capacity of your hard disk, or even the existence of the drive at all! This is especially true if the hard disk is not "period correct" for the other hardware or operating system you're running.
In the early days of the PC, DOS accessed each sector on the hard drive simply by using its physical location. So to load or store a given sector of data the PC would need to give the hard disk controller 3 pieces of information: which side of the disk, which track and which sector within this track the program wants to load or store - something like “hey controller, give me the 512 bytes of information that is stored on sector 5 from track 10 on side 1”. This method of locating data is often referred to as "CHS", or "Cylinder, Head and Sector".
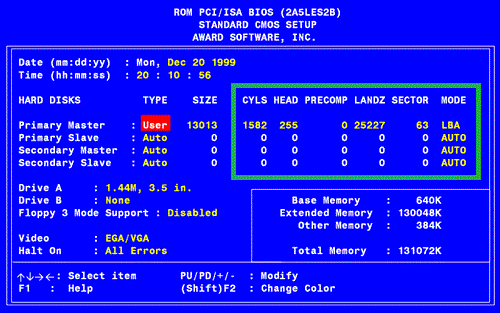
CHS drive information shown in an Award BIOS screen
The problem is that PCs had a limitation on the highest cylinder (track) number, the highest head and the highest sector number on each cylinder they could access. In fact, there were two limits: the first was in the computer BIOS – which is a program stored in the computer’s ROM memory that tells the CPU how to recognise basic peripherals like the floppy disk drive and the hard disk drive – and another limit is on the hard disk's ATA (AT Attachment) interface, which is the interface used to connect the hard disk drive to the PC (this interface is also known by other names like PATA, parallel ATA or IDE).
This table shows the various limits to understand:
| Cylinders (tracks) | Heads | Sectors | Maximum Capacity | |
|---|---|---|---|---|
| BIOS limit | 1,024 | 255 | 63 | 7.84 GB, aka the "8 GB limit" |
| ATA Interface limit | 65,536 | 16 | 255 | 127.5 GB, aka the "128 GB limit" |
| Hard Disk Drive limit | 1,024 | 16 | 63 | 504 MB |
| DOS limit | varies | varies | varies | DOS 2.x: 16 MB DOS 3.x: 32 MB max. partition size DOS 4.0 up to 6.22: 2 GB DOS 7.1 (Win95B OSR2): 124.5 GB |
Let's have a closer look at each of these limits to fully understand why they exist...
The DOS Limit
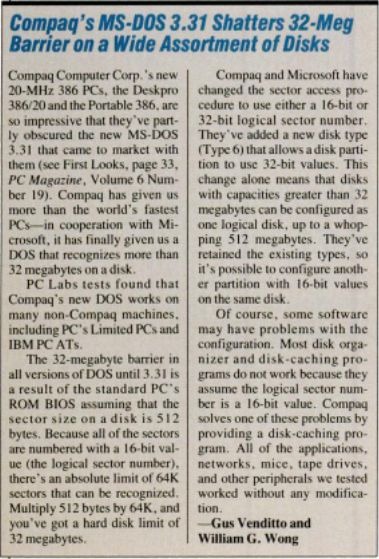 DOS versions prior to MS-DOS version 3.31 could only support a maximum disk size of 32 MB. This was due to the 16-bit width of the address of each logical sector number, resulting in a maximum of 65,535 sectors that could be individually addressed. At 512 bytes per sector (the norm at the time), this resulted in 65535 x 512 = 33,553,920 bytes, or 32 MB.
With Microsoft's introduction of MS-DOS 3.31 in November 1987, the address width of a sector could be 16- or 32-bit, meaning a new limit of 512 MB.
There is actually a further limitation imposed not so much by DOS as by the FAT filing system. In the FAT filing system, FAT entries are a maximum of 16 bits in length, meaning that there can't be more than 65,536 clusters in the drive. Because the FAT file system stores data in clusters of a set size, a file 1 byte long would still take up the minimum cluster size of 2 KB. This means there is a limit of 128 MB for the drive. When you format a drive, the FORMAT command chooses the smallest cluster size possible based on the size of the drive (or more specifically, the size of the partition on the drive), and if the drive or partition size exceeds the maximum of 128 MB, it bumps up the cluster size to make up for this limitation - so the larger the partition size, the greater the cluster size. The cluster size on a 520 MB drive (16 KB) is 8 times that of a 120 MB drive (2 KB). This means that on average, you lose 8 KB of disk space for every file on a 520 MB drive but only 1 KB lost on a 120 MB drive.
The 8 GB Limit
The original BIOS used on the IBM PC could access only up to 1,024 tracks, 255 sides and 63 sectors. Why? Let's multiply these numbers together: 1024 x 255 = 261,120. This is the highest track number it can access. We can get the total number of sectors the BIOS can access on the hard disk drive by multiplying this number by 512: 261,120 tracks x 63 sectors per track = 16,450,560. Then, finally, to get the total hard disk drive capacity [in bytes] since there are usually 512 bytes per sector... 16,450,560 x 512 = 8,422,686,720 bytes, which is 8032.5 megabytes (8,422,686,720 divided by 1024) which is 7.84 gigabytes (8032.5 divided by 1024). Thus the original BIOS used on the PC could access hard disk drives only up to a theoretical maximum of 7.84 GB.
Keep in mind that when the IDE/ATA standard was created back in 1986 people thought that this limit was almost impossible to ever reach, since at that time even the most high-end hard disk drive was 40 MB in capacity! This limit, also known as the 8 GB limit (because of the wrong definition of gigabyte being 1,000 bytes rather than 1,024), can sometimes be solved with a BIOS upgrade, and affects computers built up to 1999, give or take. You could buy a hard disk larger than 8 GB in 1997, but it was by no means commonplace and was certainly cost-prohibitive for most - for $680 USD you could pick up a Maxtor 8 GB internal hard disk.
It is important to know that even with a BIOS upgrade MS-DOS versions up to 6.22 cannot recognise extra space on a hard disk above 8 GB (Windows 3.11 and higher, Windows NT, and Linux, etc, only use the BIOS settings to be able to boot into Windows - after boot-up these operating systems use their own special drivers to access the full disk, so only the operating system data has to reside below this 8 GB barrier for it to load properly).
Windows NT also has a limitation where it can’t boot from the first partition if it is larger than 7.84 GB, but this is an operating system limitation and not the BIOS limitation explained above.
The 504 MB (or 528 MB) Limit
Then there is another limit that affected computers built up to around 1995, which is the 504 MB limit (or 528 MB, if you use the wrong definition of megabyte as 1,000 kilobytes). This limit existed because the computer needed to respect both the BIOS and ATA limits at the same time. For example, even though the ATA standard allowed addressing up to 65,536 tracks, the BIOS did not, so the computer addressing capability was limited to the lowest of the two - the BIOS' 1,024 track limit. The same goes for heads and sectors, as you can see on the table.
Once again the solution for this was a BIOS upgrade to allow a new method of addressing areas of the disk. Still a standard today for parallel hard disk drives, LBA or "Logical Block Addressing", allowed the computer to be able to address each sector of the disk sequentially instead of using its physical CHS (Cylinder-Head-Sector) values. So with LBA, instead of having to ask for sector 5 from track 16 on side 1, the system only needs to ask “hey, give me sector 1,186,612.”.
Another alternative to overcome this limit if your BIOS doesn't support LBA is to run what's called "Dynamic Drive Overlay" software, which allows the system to "see" drives larger than 528 MB. I don't know precisely how this works, but I would assume it's simply "LBA implemented in software" so the overlay software talks to the hard disk using low-level commands, avoiding BIOS commands, device drivers and other abstraction layers. Some examples of DDO software are EZ-Drive, OnTrack Disk Manager, and Seagate DiskWizard.
The 128 GB (ATA) Limit
Since these days LBA mode is widely used, you could make the assumption that there are no more limitations when accessing the highest of hard disk drive capacities. Well, sadly there is one more limitation.... the ATA interface uses a 28-bit variable to address sectors in LBA mode, creating a 128 GB (or 137 GB if you use the wrong definition of gigabyte) limit (2^28 x 512 bytes per sector).
The ATA-6 standard (a.k.a. ATA/100) increased the size of the LBA variable to 48 bits, pushing the size limit up to 128 PB (petabytes, one petabyte is 2^50, so 128 PB is equal to 131,072 TB) a limit that seems impossible to reach (let’s see 10 years from now if this statement continues to be true!). By the way, this limit is also known as the 144 PB limit, if the wrong definition of petabyte is used.
To solve this 128 GB limitation, two things are needed. First, update the motherboard BIOS to the latest version available. Second, run Maxtor's “Big Drive Enabler,” a Windows program to enable 48-bit LBA addressing in Windows ME, NT, 2000 and XP SP1 or SP2. By default, these operating systems don't recognize hard drives over 128 GB as they only support 24-bit LBA addressing. For Windows 95 there's a further problem in that it doesn’t support hard drives above 32 GB due to a system limitation that isn’t related to what we are describing here, and Windows 98 doesn’t support hard disk drives over 128 GB also due to another unrelated problem, so with 95 or 98, there is no solution to the 128 GB limit).
If your drive is larger than 8 GB and lower than 128 GB, you can install Windows 98 on it by: (1) boot your PC with the Windows 98 Setup floppy disk, (2) run the version of FDISK that is on the floppy and say 'Yes' when it asks you if you want it to support big disks, (3) create a new large partition. It may incorrectly tell you the disk size is 10,781 MB or some other number that you know is wrong - this number is sometimes the actual disk size less 64 GB - just ignore this for now and create the primary DOS partition, (4) format that partition with "A:\FORMAT C: /s" and it should format the whole drive to its maximum size, and finally (5) run SETUP.EXE from the Windows 98 CD-ROM to install it. Unlike Windows NT or later versions of Windows like XP, the Windows 98 SETUP program does not have the capability to do any partitioning or formatting for you.
ATA? IDE?
Advanced Technology Attachment (ATA) was a new storage interface standard introduced in 1994. These days we still use the term ATA when we refer to modern hard disks that use SATA (Serial ATA) to communicate with the hard disk. The original ATA standard ran in parallel (now referred to as PATA to distinguish it from the more modern SATA).
By contrast, IDE, which stands for Integrated Drive Electronics, is simply the drive type that took over from the older types of hard disk which required a seperate disk controller card. With IDE drives, the circuitry needed for the motherboard to communicate with the drive mechanism was integrated into the drive itself, thus eliminating the need for a seperate "disk controller" card to communicate with the drive.
The terms ATA and IDE are often used interchangeably, and I'm pretty OK with that. We all know what you mean when you say IDE drive!
The ATA standard was extended and enhanced, but always remained backwardly-compatible with older versions of the ATA standard, so any Parallel ATA hard disk can be used on any motherboard that supports a version of ATA - you just might not be getting all the features the drive supports if you're running it on an older motherboard whose IDE interface doesn't support the latest ATA standard. The table below summarises the evolution of the "AT Attachment" (ATA) standard.
| PIO* Modes Supported | Highest data transfer rate (Megabits per second) | Notes | |
|---|---|---|---|
| ATA and ATA-1 (1994) | 0, 1 and 2 | 8.3 | |
| ATA-2, EIDE, Fast ATA/IDE, Ultra ATA (1996) | 0 - 4 | 16.7 | Added bus-mastering DMA support. Introduced LBA for larger drives up to 8.4 GB |
| ATA-3 (1997) | 0 - 4 | 16.7 | Introduced S.M.A.R.T. for hard disk health monitoring |
| ATA-4 (1998) | 0 - 4 | 33 | Introduced UDMA/33 |
| ATA-5 (1999) | 0 - 4 | 66 | Introduced UDMA/66, which used a new 80-wire cable over the previous 40-wire. |
| ATA-6 (2001) | 0 - 4 | 100 | Introduced UDMA/100. LBA now 48 bits long, allowing for up to 128 PB (petabytes) of theoretically accessible storage. |
PIO, or Programmed Input/Output is a means of transferring data from one device to another without using main memory or DMA (Direct Memory Access) - the data goes via the CPU only. Because PIO data transfers rely heavily on the CPU, your system can practically lock up during these file transfers. It is slower than DMA, so whenever possible it's best to configure your IDE interface to run in DMA or UDMA (Ultra-DMA) mode. PIO Mode 0 supported data transfer speeds up to 3.3 Mbps (megabits per second), mode 1 up to 5.2 Mbps, mode 2 up to 8.3 Mbps, mode 3 up to 11.1 Mbps, and mode 4 up to 16.6 Mbps.
"Why use PIO mode?" I hear you say! Well, unless your motherboard supports ATA-4 or higher, you have no choice. The use of DMA for hard disk data transfers was only introduced with ATA-4 with what was called UDMA/33.
ATA-2 addressed the problem of PIO modes bogging down the CPU by including bus-mastering Direct Memory Access (DMA), allowing data transfers between the hard drive and memory to occur without using the CPU; the transfers access memory directly, hence the name. ATA-2 (or EIDE, Enhanced IDE, depending on the drive manufacturer) supported 16.7 MB/sec throughput. ATA-2 also included a fix for the 2.1 GB drive limit in the form of Logical Block Addressing (LBA). LBA is a translation scheme that contains new drive parameter tables that replace the old Cylinder/Head/Sector (CHS) tables used by the BIOS to set drive sizes. The new sizes increased the access limit to 8.4 GB by using 24 bits of addressing space. Now we know that even 8.4 GB wasn't large enough. Microsoft address the problem with a new file system called FAT32X, which was shipped with the OEM release of Windows 95 (OSR2), and later with Windows 98.
ATA-3 didn't add a great deal to the ATA specification, focussing more on power-saving enhancements and timing modifications. The biggest addition was probably S.M.A.R.T. hard disk health monitoring.
Ultra ATA technology was invented by Quantum. The first Ultra ATA spec was UDMA/33 or Ultra DMA/33, introduced with the ATA-4 standard in 1998. This brought twice the speed of the previous interface - up to 33 Mbps (megabits per second) - by transporting twice the data per clock cycle. By doubling the rate at which the buffer is emptied, UDMA/33 compensated for command-turnaround and avoided 'slipped revs', in addition to a reduced CPU overhead.
UDMA/66 introduced in the ATA-5 standard and again invented by Quantum, arrived in 1999, doubled the total bus bandwidth to 66 Mbps. This required a new cabling standard. Before new data can be transmitted across any UDMA pipeline, the controller must first wait for the residue of previously-sent data to dissipate; this electronic interference is called cross-talk. Because this cross-talk can be mistaken for data, the UDMA/33 spec introduced a timing margin called a setup time which is inserted between transfers and allows for interference to fade away before the controller once again begins detecting ones and zeros. UDMA/66 addressed the cross-talk problem with the introduction of new 80-conductor cabling (contains 80 conductor lines but still only uses 40 pins on each connector). The new lines are additional ground lines which allow the controller to cut the setup time in half, thereby increased the data transfer rate to twice that of UDMA/33. From mid-to-late 1999, motherboard chipsets that supported UDMA/66 would include the ability to detect whether a 40-conductor cable or 80-conductor cable was being used and allow for UDMA/33 or UDMA/66 accordingly.
UDMA/100 introduced later further pushed the performaance of the Parallel ATA interface until the move to Serial ATA in 2000.
To get the best possible speed out of your hard disk, use the highest UDMA both your hard disk and motherboard supports (as well as your cable), and if UDMA isn't supported at all, use the highest PIO mode they both support.
Can I Use Them Still Today?
Sadly a great many of hard disks from the 80s no longer work. Being mechanical devices they are much more prone to failure, and the data on the platters is known to deteriorate over time unless re-magnetised fairly frequently. I'm not an expert on such topics, so I speak purely from personal experience.
In around 2013 I bought about six NOS (New Old Stock) 3.5" Samsung-branded hard disks still in their original packaging - they were incredibly cheap, like $10 each cheap. I am still using one of these today as a boot drive on my retro PC. There is definitely something very authentic about using a mechanical / magnetic hard disk in the 2020s for retro computing, with the gentle whirring and clickety noises when it spins up and disk access occurs. I do recommend trying to acquire NOS drives if you can and they are cost-effective for you, but don't rely on them long-term for data storage.
It's likely the drive size will mean you only ever use a fraction of its full capacity, but that's really not the point - I have four partitions on mine for DOS 6.22 purposes, which gives me ample space for my needs. If you're more into the CD-ROM gaming era and perhaps want to store several entire games on the hard disk you'll need more of course.
I've had enough problems with SD and CompactFlash card corruption that I really don't trust this medium any more than the old hard disks. I do use them all the time, but frequently have to reformat and restore their contents from a backup. They also seriously don't like being yanked from a modern PC without you choosing the 'Eject' option first in Windows 10/11, so be sure you do this whenever you copy files to an SD or CF card.
If you liked this article or have something to add or correct, just let me know using the 'Contact Us' link below.